This project was to emulate a watercolorist we admire. While James Gurney is not strictly a watercolorist, he uses them frequently for studies while out and about. I copied a study he did of a cow he saw while visiting a farm. You can read the whole story on his blog here. If you've never heard of James Gurney or visited his blog, it is a wonderful resource of artistic knowledge and learning.
Tuesday, December 14, 2010
Watercolor - Sea Turtle
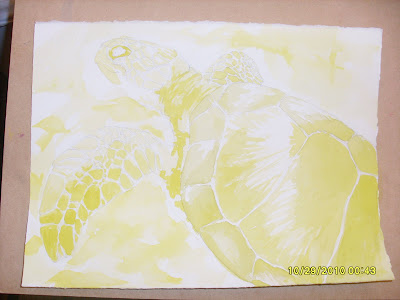
This painting was done using a watercolor technique called direct glazing. How it works is you paint the painting in layers of color. First yellow, then orange and red, waiting for each layer to be completely dry before moving on to the next. Up to red isn't too bad, because you're just working in warm colors and thinking about what the values will be like with all of the layers together. When it really gets interesting, and kind of scary at times is in the next layers which are blue and green. These layers are great for darkening darks. The blue is probably my favorite because it's like a rainbow in every stroke! The green is good for toning down reds. I had to do that quite a bit on the shell of the turtle before it was really finished.
I really liked doing this process and I want to do more with it in the future. Here is a picture of how I did the yellows.
This was painting in yellow where ever I saw yellow and using darker yellows where I knew the values would be darker later. It's a really different way to think about painting, but it was fun. I definitely need more practice at it.
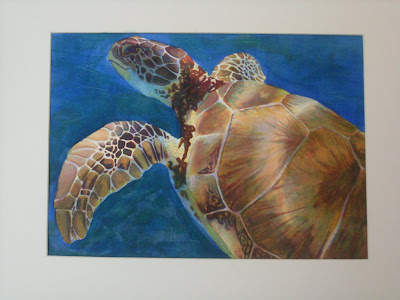
And this is the final result! I had so much fun!
Thursday, October 21, 2010
Watercolor - Glazing Colors Exercise
This exercise shows how you can create different colors by glazing(A wash dried + B wash). My class did a little different format than I did. The approach I took was something I saw on James Gurney's blog(the creator of the Dinotopia books). His watercolor exercise is here. The diagonal colors are the pure pigments and the two sides show how the colors combine as glazes and the differences between having each color layered underneath and on top of all the other colors. Under each swatch there's a little formula telling what is there. Color A is the color underneath and color B is on top. A + B = what you see. It was great fun!!
Watercolor - "French Horn Portrait"
The assignment or purpose of this painting was to gain experience with painting darks with watercolor. I got my reference and inspiration for this painting from my friend Jessica Willey. She gave me permission to use pictures from her blog for photo reference. You can visit her blog here and her portfolio blog here. This reference is from a set of portraits Jessica did for a girl who play's the french horn. Painting the girl was fun with the interesting lighting going on and I'm really pleased with how she turned out. The large dark wash in the background was harder for me, but with time and some happy accidents/tender mercies, it turned out great!
Prints Available
Wednesday, October 6, 2010
Watercolor - Texture Experimentation

In preparation for our next assignment, a painting structured around textures, we got to experiment with making whatever kind of textures we wanted. My favorites were saran wrap, rice, and twisting a stiff fibrous tube(I don't actually know what it is). Here are some close ups.

This close up has rice, cork, shower poof, that fiber tube thingy, salt, garbage bag, and crumby paper towels.

This one is a little fuzzy, but it's a close up of how the saran wrap turned out. I like it a lot.

This one has sea sponge, the fiber tube twisted on it's end, and basically those same things repeated in a few "squares." Oh look! There's the saran wrap again. ;)
I'm not sure what I'll do for the texture painting, but I want to do something with either saran wrap, the swirls, or rice. We'll see!
Subscribe to:
Posts (Atom)
Contact me for pricing on prints or originals.